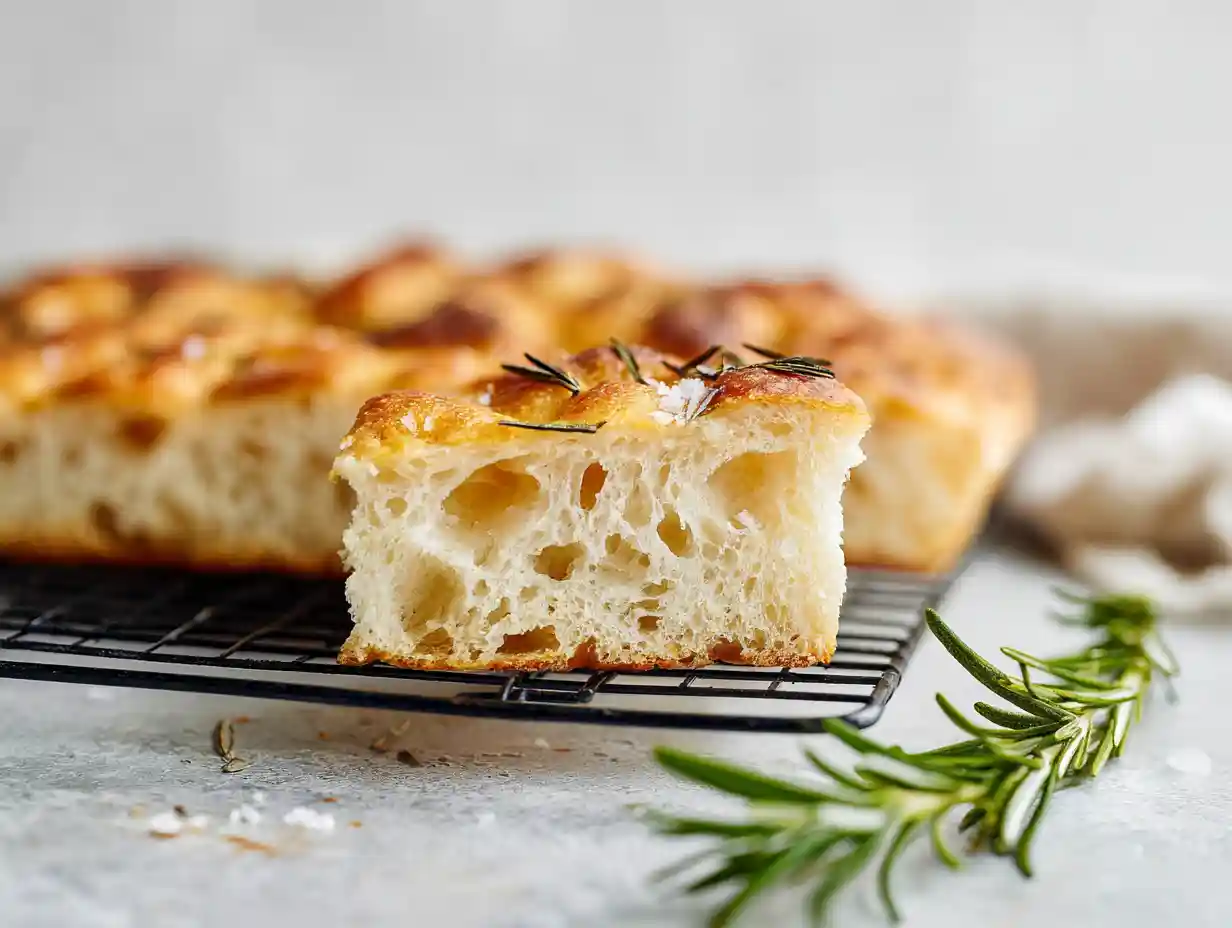
I remember the first time I made focaccia from scratch. The way the golden, olive oil-rich crust crackled under the knife and the soft, airy crumb inside steamed gently was pure magic. It felt like I had unlocked a secret to creating something truly special in my own kitchen. Since then, I’ve been on a mission to perfect it, and I’m so excited to share my ultimate guide with you. This is the only Sourd sourdough Focaccia Recipe you will ever need, and I promise it’s achievable, even if you’re just starting your sourdough journey.
This recipe creates a bread that is incredibly flavorful, with a chewy, open crumb and a crisp, golden crust that will have everyone reaching for another piece. It’s simple, forgiving, and the perfect canvas for all your favorite toppings.
Table of Contents
Sourdough Focaccia Recipe
Ingredients
Equipment
Method
- Place the starter, salt, and water in a large bowl. Stir with a spatula to combine — it doesn’t have to be uniformly mixed. Add the flour. Mix again until the flour is completely incorporated.
- If time permits, perform one “fold”: 30 minutes after you mix the dough, reach into the bowl and pull the dough up and into the center. Turn the bowl quarter turns and continue this pulling 8 to 10 times.
- Drizzle with a splash of olive oil and rub to coat. Cover bowl with a tea towel or bowl cover and set aside to rise at room temperature (70ºF/21ºC) for 4 to 18 hours (the time will vary depending on the time of year, the strength of your starter, and the temperature of your kitchen — in summer, for instance, my sourdoughs double in 6 hours; in winter, they double in 18 hours. It is best to rely on visual cues (doubling in volume) as opposed to time to determine when the bulk fermentation is done.
- When dough has doubled, place 2 tablespoons of olive oil into a 9×13-inch pan. If you are using a glass pan, you may, as a precaution, want to butter it it first.
- Drizzle dough with a tablespoon of olive oil. Use your hand to gently deflate the dough and release it from the sides of the bowl. Gently scoop the dough into the center of the pool of oil in your prepared pan. Fold dough envelope style from top to bottom and side to side to create a rough rectangle. Turn dough over so seam-side is down.
- Rub top of dough with oil. Leave alone for 4 to 6 hours, uncovered, or until puffy and nearly doubled.
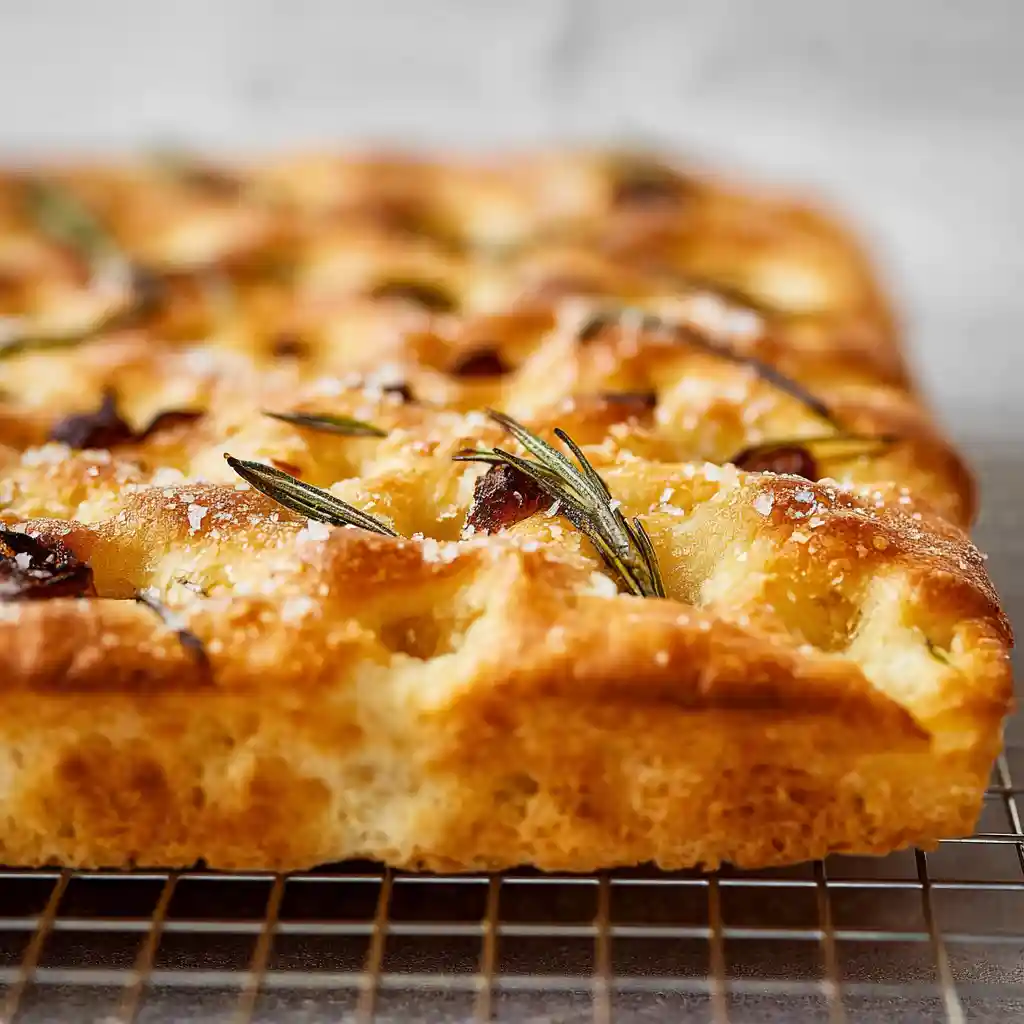
- Heat oven to 425ºF. Rub hands lightly with oil, and using all ten fingers, press gently into the dough to dimple and stretch the dough to nearly fit the pan. Sprinkle generously with sea salt. Transfer pan to the oven and bake for about 25 minutes or until golden all around. Remove pan from oven and transfer bread to a cooling rack. Cool at least 20 minutes before slicing.
Notes
• Rosemary & Flaky Sea Salt
• Garlic & Kalamata Olives
• Caramelized Onion & Thyme
• Fig & Prosciutto (add prosciutto after baking)
• Spicy Pepperoni & Hot Honey (drizzle honey after baking) How to Serve and Store:
Slice for sandwiches, make croutons, or serve on a charcuterie board. To store, keep it in a paper bag on the counter for up to 2 days. For longer storage, wrap cooled focaccia in plastic wrap and foil, and freeze for up to a month. Reheat in a 375°F oven for 10-15 minutes. 5-Minute Herb & Garlic Dipping Oil:
Combine 1/2 cup of high-quality extra-virgin olive oil, 2 minced garlic cloves, 1 tablespoon of chopped fresh parsley, 1 teaspoon of dried oregano, a pinch of red pepper flakes, and a sprinkle of flaky sea salt. Par-baking:
To par-bake, bake at 400°F for about 15-20 minutes, until set but pale. Cool completely, wrap well, and store on the counter for a day or freeze. To finish, bake at 425°F for another 10-15 minutes until golden brown.
Tried this recipe?
Let us know how it was!Why This Sourdough Focaccia Recipe is the Best
I’ve tested countless methods, and I truly believe this guide sets you up for success every single time. Here’s why this recipe stands out from the rest:
- The Clearest Step-by-Step Visuals: I’ve included photos and descriptions for every stage, so you know exactly what your dough should look like from mixing to baking.
- Troubleshooting for Every Common Problem: Is your focaccia too dense or the bottom a little soggy? I’ve created a simple troubleshooting chart to help you identify and fix any issue.
- Endless Topping and Serving Inspiration: I’m sharing my favorite topping combinations, from classic to creative, plus fun ways to serve your focaccia so you never get bored.
Understanding the Key Ingredients
Great bread starts with great ingredients. Understanding the role each one plays is the key to a perfect loaf.
Using bread flour is my preference because its higher protein content develops more gluten, giving the focaccia a wonderfully chewy crust and structure. If you only have all-purpose flour, it will still work beautifully, but the result will be a slightly softer, more tender crumb.
For the olive oil, I use two types. A standard, good-quality olive oil is perfect for coating the pan because it can handle the high heat of the oven without smoking. For finishing the focaccia and for dipping, I break out a high-quality, flavorful Extra Virgin Olive Oil. Its fresh, peppery notes really shine when it’s not exposed to high heat.
Your active sourdough starter is the heart of this recipe, providing all the lift and that signature tangy flavor. And finally, using room-temperature water helps kickstart fermentation at a steady, predictable pace.
The Ultimate Pan Guide: Choosing Your Equipment
You don’t need a lot of fancy equipment for this recipe, but a kitchen scale and a large bowl are essential for accurate and consistent results. The most important choice you’ll make, however, is your baking pan. The material of your pan directly impacts the crispiness of your focaccia’s crust.
- Metal Non-Stick Pan (9×13-inch): This is my top recommendation for this recipe. A light-colored metal pan, like the one I use, conducts heat evenly and efficiently, resulting in a perfectly crisp, golden-brown bottom crust that releases easily every time.
- Cast Iron Skillet: Baking focaccia in a cast iron skillet will give you the absolute crispiest, most gloriously fried bottom crust. It holds heat incredibly well. Just be sure to reduce the baking time slightly and keep an eye on it, as the bottom can brown much faster.
- Glass Bakeware: A glass pan works, but it’s not my favorite for focaccia. Glass is an insulator, so it heats up more slowly and doesn’t conduct heat as well as metal. This can sometimes lead to a softer, less crispy bottom crust. If using glass, I recommend taking extra care to grease it well to prevent sticking.
How to Make This Sourdough Focaccia Recipe (Step-by-Step)
Let’s walk through the process together. Don’t worry, it’s easier than you think! Just follow along with the photos.
Step 1: Mixing The Dough
First, combine your active starter, salt, and water in a large bowl and give it a quick stir. Then, add the bread flour and mix with a spatula until no dry spots remain. It will look shaggy, and that’s perfectly fine. If you have time, perform one set of “folds” about 30 minutes later to build a little strength.
Step 2: Bulk Fermentation (The First Rise)
Drizzle the dough with olive oil, cover the bowl, and let it rise at room temperature. This is called the bulk fermentation, and it can take anywhere from 4 to 18 hours. The timing depends entirely on the temperature of your kitchen and the strength of your starter. You’re looking for the dough to double in volume, so rely on what you see, not the clock.
Step 3: The Second Rise in the Pan
Once the dough has doubled, generously oil your 9×13-inch pan. Gently scoop the dough into the pan and fold it like an envelope to form a rough rectangle. Flip it over so the seam is on the bottom, rub the top with a bit more oil, and let it rest for 4 to 6 hours until it’s puffy and has nearly doubled again.
Step 4: Dimpling, Topping, and Baking to Perfection
Preheat your oven to 425°F. Now for the fun part! Coat your fingers in olive oil and press down firmly into the dough, creating those classic dimples all over the surface. Sprinkle generously with flaky sea salt and your favorite toppings, then bake for about 25 minutes until beautifully golden all around.
Visual Guide: Is My Dough Ready?
Knowing when your dough is perfectly proofed for the second rise is crucial. Here’s what to look for right before it goes into the oven.
- [Image of Under-Proofed Focaccia Dough]
- Under-Proofed: The dough looks tight and resists dimpling. It will spring back quickly when you press it, and the final bread may be dense.
- [Image of Perfectly Proofed Focaccia Dough]
- Perfectly Proofed: The dough is puffy, airy, and full of visible bubbles. Your fingers will leave distinct, lasting dimples. This is the sweet spot for a light, open crumb.
- [Image of Over-Proofed Focaccia Dough]
- Over-Proofed: The dough looks slack and may even start to collapse when you dimple it. It has lost its structure and will likely bake up flat and dense.
Baker’s Timeline: Sample Sourdough Focaccia Schedules
Sourdough baking is all about fitting it into your life. Here are two sample schedules to help you plan.
Overnight Method (Cooler Kitchen, around 70°F/21°C)
- 9:00 PM: Mix the dough.
- 9:30 PM: Perform folds.
- 9:30 PM – 11:30 AM (next day): Bulk fermentation on the counter (12-14 hours).
- 11:30 AM: Place dough in the oiled pan for its second rise.
- 4:30 PM: Dimple, top, and bake.
- 5:00 PM: Cool and enjoy for dinner!
Same-Day Method (Warmer Kitchen, around 75°F/24°C)
- 8:00 AM: Mix the dough.
- 8:30 AM: Perform folds.
- 8:30 AM – 2:30 PM: Bulk fermentation on the counter (6 hours).
- 2:30 PM: Place dough in the oiled pan for its second rise.
- 6:30 PM: Dimple, top, and bake.
- 7:00 PM: Cool and enjoy for dinner!
Topping Inspiration for Your Focaccia
This is where you can get really creative! Here are a few of my favorite combinations.
Classic Toppings
- Rosemary & Flaky Sea Salt: The timeless combination. The woody aroma of fresh rosemary infused into the olive oil is simply irresistible.
- Garlic & Olive: Thinly sliced garlic cloves and briny Kalamata olives create a savory, Mediterranean-inspired flavor that is absolutely delicious.
Creative Variations
- Caramelized Onion & Thyme: Sweet, jammy caramelized onions paired with earthy thyme make for a sophisticated and deeply flavorful topping.
- Fig & Prosciutto: A perfect balance of sweet and savory. Add fresh figs before baking and drape delicate slices of prosciutto on top right after it comes out of the oven.
- Spicy Pepperoni & Honey: Arrange pepperoni slices over the dough before baking. Once it’s out of the oven, drizzle it with a generous amount of hot honey for a spicy-sweet kick.
How to Serve and Store Your Sourdough Focaccia
Beyond just dipping it in olive oil, there are so many ways to enjoy your beautiful creation. I love to use it as the base when I create a simple, affordable charcuterie board, arranging slices alongside cheeses, cured meats, and olives. You can also slice it horizontally for incredible gourmet sandwiches or cut leftover pieces into cubes, toss with olive oil, and bake them into croutons for the best Thanksgiving stuffing recipe you’ve ever had.
For an amazing dip, try this super simple oil.
5-Minute Herb & Garlic Dipping Oil In a small bowl, combine 1/2 cup of high-quality extra-virgin olive oil, 2 minced garlic cloves, 1 tablespoon of chopped fresh parsley, 1 teaspoon of dried oregano, a pinch of red pepper flakes, and a sprinkle of flaky sea salt. Let it sit for a few minutes for the flavors to meld.
To store your focaccia, keep it in a paper bag or wrapped loosely on the counter for up to 2 days. For longer storage, you can freeze it. Wrap the cooled focaccia tightly in plastic wrap and then foil, and it will keep in the freezer for up to a month. To reheat, just pop it in a 375°F oven for 10-15 minutes until warm and crisp.
The Ultimate Sourdough Focaccia Recipe
Get ready to bake the most beautiful, delicious, and satisfying bread. This recipe will guide you to a perfect loaf with a pillowy-soft interior and a golden, crispy crust, all thanks to the magic of sourdough.
Ingredients
- 50 g – 100 g (1/4 to 1/2 cup) active starter, see notes above
- 10 g (about 2.5 teaspoons) kosher salt
- 430 – 440 g water (1.75 cups – 1.75 cups + 2 tablespoons), room temperature, see notes above*
- 512 g (about 4 cups) bread flour, see notes above
- 3 tablespoons extra-virgin olive oil, divided, plus more for drizzling
- Nice, flaky sea salt, such as Maldon
Instructions
- Place the starter, salt, and water in a large bowl. Stir with a spatula to combine — it doesn’t have to be uniformly mixed. Add the flour. Mix again until the flour is completely incorporated.
- If time permits, perform one “fold”: 30 minutes after you mix the dough, reach into the bowl and pull the dough up and into the center. Turn the bowl quarter turns and continue this pulling 8 to 10 times. See video for guidance.
- Drizzle with a splash of olive oil and rub to coat. Cover bowl with a tea towel or bowl cover and set aside to rise at room temperature (70ºF/21ºC) for 4 to 18 hours (the time will vary depending on the time of year, the strength of your starter, and the temperature of your kitchen — in summer, for instance, my sourdoughs double in 6 hours; in winter, they double in 18 hours. Do not use an oven with the light on for the bulk fermentation — it will be too warm. It is best to rely on visual cues (doubling in volume) as opposed to time to determine when the bulk fermentation is done. A straight-sided vessel makes monitoring the bulk fermentation especially easy because it allows you to see when your dough has truly doubled.).
- When dough has doubled, place 2 tablespoons of olive oil into a 9×13-inch pan. (I have been using this USA Pan, which I love. I have had no sticking issues. If you are using a glass pan, you may, as a precaution, want to butter it it first — I have had disasters with bread sticking when I’ve used oil alone with other baking vessels.)
- Drizzle dough with a tablespoon of olive oil. Use your hand to gently deflate the dough and release it from the sides of the bowl. Gently scoop the dough into the center of the pool of oil in your prepared pan. Fold dough envelope style from top to bottom and side to side to create a rough rectangle. Turn dough over so seam-side is down. Video guidance here.
- Rub top of dough with oil. Leave alone for 4 to 6 hours, uncovered, or until puffy and nearly doubled.
- Heat oven to 425ºF. Rub hands lightly with oil, and using all ten fingers, press gently into the dough to dimple and stretch the dough to nearly fit the pan. Sprinkle generously with sea salt. Transfer pan to the oven and bake for about 25 minutes or until golden all around. Remove pan from oven and transfer bread to a cooling rack. Cool at least 20 minutes before slicing.
Troubleshooting Your Sourdough Focaccia
Even the best of us run into issues sometimes. Here’s a quick guide to help you figure out what might have gone wrong.
| Problem | Potential Cause | Solution |
|---|---|---|
| My focaccia is too dense. | The dough was under-proofed, or your starter wasn’t active enough. | Make sure your starter is bubbly and active before using it. For the next bake, allow the dough to rise until it has truly doubled in size for both rises. |
| The bottom is soggy. | Too much oil was used in the pan, or the oven temperature was too low. | Use the recommended amount of oil. Ensure your oven is fully preheated, and consider using a metal pan for better heat conduction. |
| My toppings burned. | Toppings were added too early, or they were too delicate. | Add delicate herbs like basil after baking. For things like garlic, you can toss them in olive oil first to help prevent them from burning. |
| I didn’t get big bubbles. | The dough was handled too roughly, or it was over-proofed. | Be very gentle when transferring the dough to the pan and when dimpling it to preserve the air pockets. Keep a close eye on the second proof to avoid it going too long. |
FAQs about Sourdough Focaccia
Can I use my sourdough discard in this recipe?
This recipe relies on a lively, active sourdough starter for lift and flavor. Sourdough discard doesn’t have the leavening power needed to make the dough rise properly, so I don’t recommend using it here.
How do I par-bake focaccia to finish later?
To par-bake it, bake the focaccia at 400°F for about 15-20 minutes, until it’s set but still pale. Let it cool completely, then wrap it well. You can store it on the counter for a day or freeze it. To finish, bake it at 425°F for another 10-15 minutes until golden brown.
Can I make this sourdough focaccia recipe in a different-sized pan?
Absolutely! A 10-inch cast iron skillet or two 8-inch round pans would work great. Just be aware that the thickness of the focaccia will change, so you may need to adjust the baking time accordingly.
Why isn’t my dough rising?
The most common reasons are an inactive starter or a cold kitchen. Make sure your starter is at its peak activity when you use it. If your kitchen is cool, find a slightly warmer spot for your dough to rise, like near a sunny window or on top of your refrigerator.
Conclusion
There is something incredibly rewarding about pulling a beautiful, golden loaf of homemade sourdough focaccia from the oven. The smell alone is worth the effort! I hope this guide gives you the confidence to dive in and create this amazing bread in your own kitchen.
I would love to see your creations! Please leave a comment below with your favorite topping combination, and don’t hesitate to ask any questions you might have. If you share your focaccia on social media, be sure to tag me at The Savory Script! Happy baking