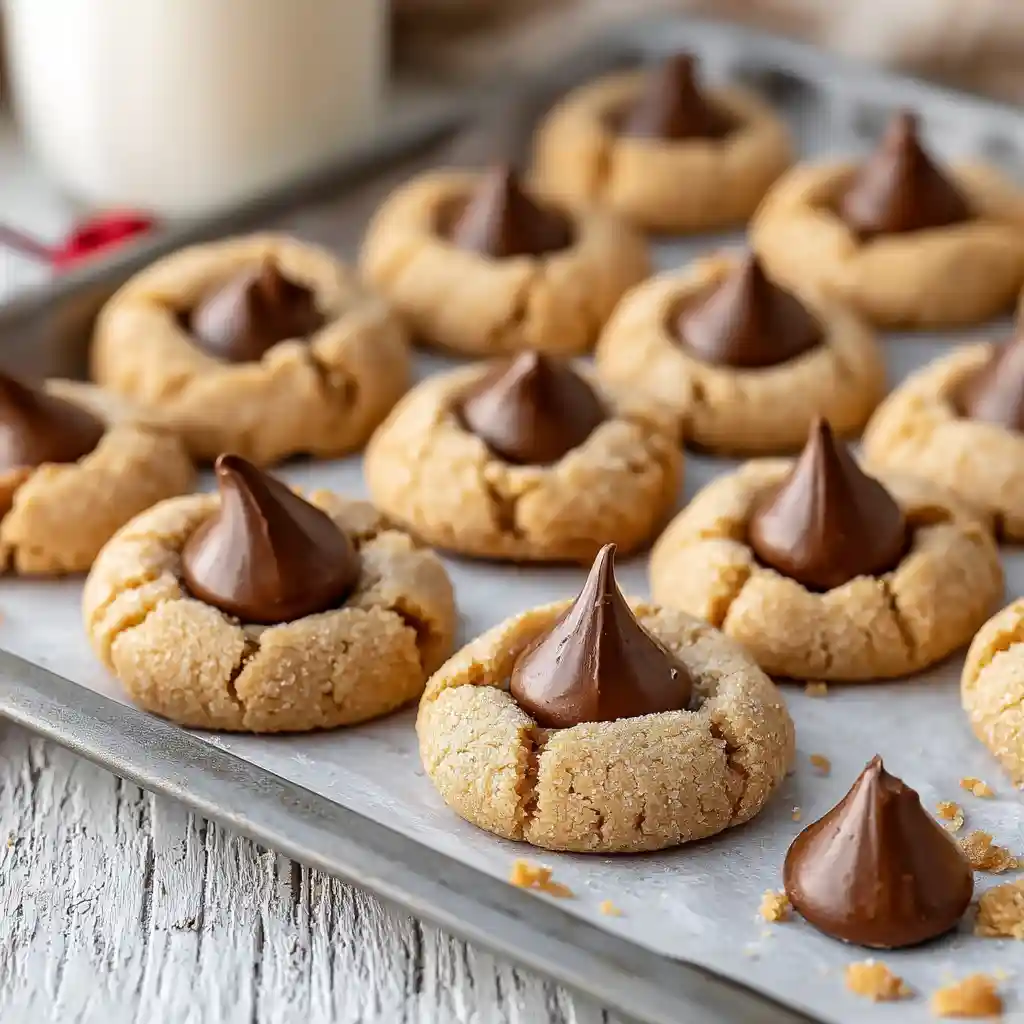
When I was a little girl, I remember eagerly waiting for the holidays, not just for the presents, but for the smell of freshly baked cookies filling my grandma’s kitchen. One of the treats I looked forward to most was her Peanut Butter Blossoms. The combination of sweet peanut butter cookie and creamy chocolate kiss was pure bliss.
Today, I’m sharing my version of this classic, a recipe that’s sure to bring back those warm, nostalgic feelings. These Peanut Butter Blossoms are super easy to make and the entire process takes about 30 minutes. Let’s get baking!
Table of Contents
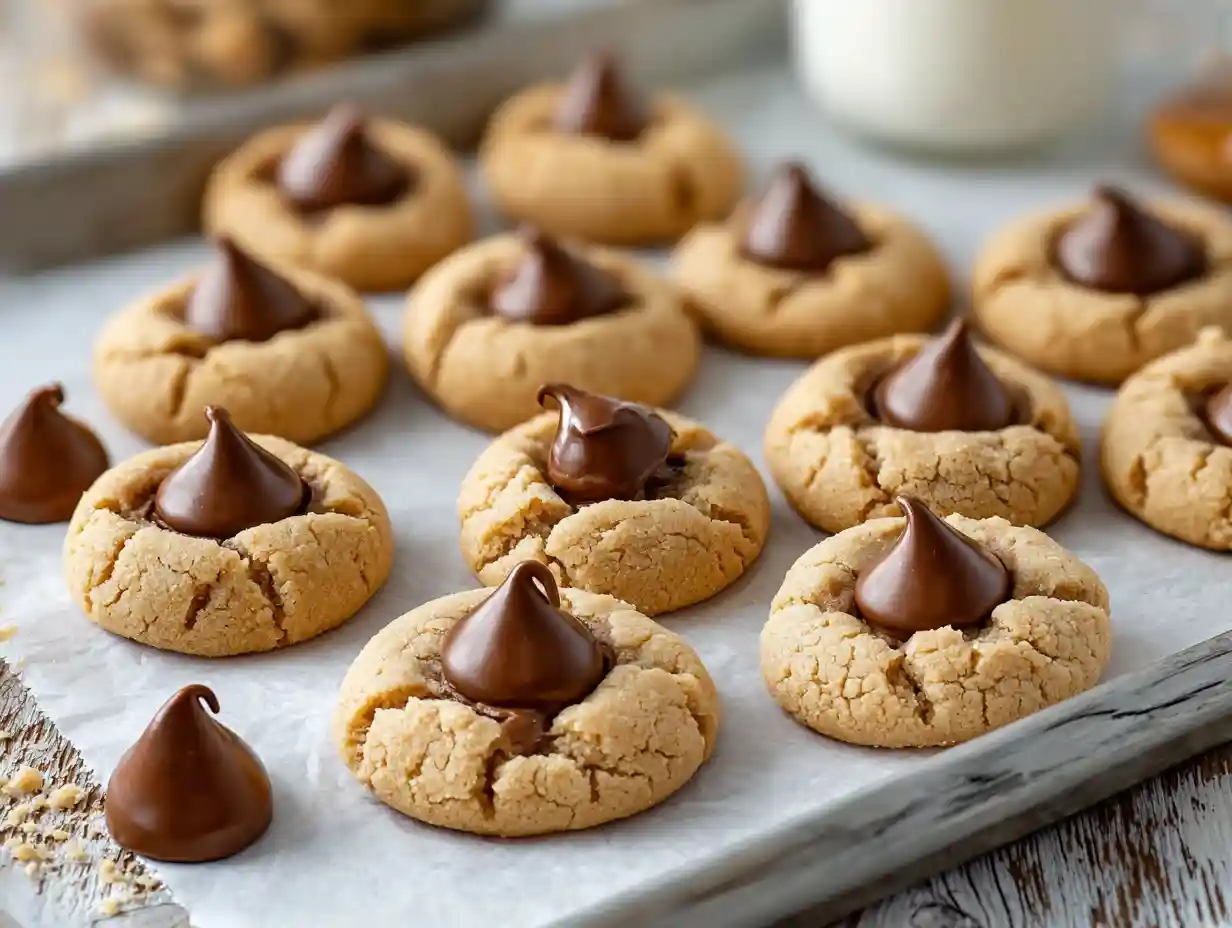
Peanut Butter Blossoms Recipe
Ingredients
Method
- Preheat your oven to 375°F. Line your cookie sheets with parchment paper.
- In a large mixing bowl or your stand mixer, combine the peanut butter, vegetable shortening, granulated sugar, brown sugar, and salt. Beat on medium speed until everything is well combined.
- Add the egg and vanilla extract to the peanut butter mixture. Beat until fully combined. Scrape down the sides of the bowl to ensure everything is mixed in.
- Add the flour and baking soda to the wet ingredients. Mix on low speed just until everything is combined.
- Scoop the dough and roll it into 1-inch balls. Roll each ball in granulated sugar if you want an extra touch of sweetness. Place the dough balls on the prepared baking sheets, leaving about 2 inches of space between each cookie.
- Bake the cookies for 8 to 10 minutes, or until the edges are lightly golden and the cookies look puffy and cracked.
- Immediately press a chocolate kiss into the center of each warm cookie. Don’t worry if the cookies crack; that’s normal.
- Allow the cookies to cool completely on the baking sheet until the chocolate is set. Serve and enjoy! Store in an airtight container for up to a week.
Nutrition
Notes
Tried this recipe?
Let us know how it was!Why You’ll Love These Peanut Butter Blossoms
- Perfect Balance: The recipe achieves the ideal blend of salty peanut butter cookie and sweet chocolate.
- Soft Texture: I’ve perfected the recipe to ensure each cookie is soft, chewy, and melt-in-your-mouth delicious.
- Foolproof Method: The instructions are straightforward, so even beginner bakers can achieve perfect results.
- Classic Comfort: It’s a timeless treat that brings joy to every bite.
The History of Peanut Butter Blossoms
Peanut Butter Blossoms first emerged in the 1960s, quickly becoming a holiday favorite in the United States. The Hershey Company’s introduction of the iconic Hershey’s Kisses helped to popularize the cookie, making it a staple in cookie exchanges and festive gatherings. Its simplicity and delicious taste have solidified its place in American baking history, especially during Christmas and other holidays.
The origin of the peanut butter cookie itself can be traced back earlier, with George Washington Carver promoting peanuts in his publications, including a cookbook featuring various peanut preparations. While the exact first recipe for a cookie with peanut butter is debated, early versions date back to the late 19th and early 20th centuries. The development of shelf-stable peanut butter by Joseph L. Rosefield in the 1920s further contributed to its widespread popularity.
Key Ingredients for Perfect Peanut Butter Blossoms
The quality of your ingredients significantly impacts the final product.
- Peanut Butter: I highly recommend using creamy peanut butter for this recipe. You can use natural peanut butter, but be aware that it might result in a drier cookie, so you might need to adjust the amount of flour slightly.
- Sugars: A mix of granulated and brown sugar provides the perfect balance of sweetness and chewiness. I recommend using light brown sugar for its subtle molasses flavor.
- Eggs: Make sure your eggs are at room temperature. Room temperature eggs help emulsify the batter for a smoother dough.
Ingredients You’ll Need
- ¾ cup creamy peanut butter ((188g))
- ½ cup unsalted vegetable shortening (softened (113g))
- ½ cup granulated sugar (plus more for rolling (100g))
- ½ cup packed light brown sugar ((110g))
- ¼ teaspoon salt
- 1 large egg (room temperature)
- 1 teaspoon vanilla extract
- 1½ cups all-purpose flour ((180g))
- ½ teaspoon baking soda
- 36 Hersey’s chocolate kisses (unwrapped)
How to Make Peanut Butter Blossoms: Step-by-Step
Here’s how to make these delightful Peanut Butter Blossoms:
- Preheat and Prep: Preheat your oven to 375°F. Line your cookie sheets with parchment paper.
- Cream the Base: In a large mixing bowl or your stand mixer, combine the peanut butter, vegetable shortening, granulated sugar, brown sugar, and salt. Beat on medium speed until everything is well combined.
- Add Wet Ingredients: Add the egg and vanilla extract to the peanut butter mixture. Beat until fully combined. Scrape down the sides of the bowl to ensure everything is mixed in.
- Incorporate Dry Ingredients: Add the flour and baking soda to the wet ingredients. Mix on low speed just until everything is combined.
- Shape the Cookies: Scoop the dough and roll it into 1-inch balls. Roll each ball in granulated sugar if you want an extra touch of sweetness. Place the dough balls on the prepared baking sheets, leaving about 2 inches of space between each cookie.
- Bake: Bake the cookies for 8 to 10 minutes, or until the edges are lightly golden and the cookies look puffy and cracked.
- Add the Kisses: Immediately press a chocolate kiss into the center of each warm cookie. Don’t worry if the cookies crack; that’s normal.
- Cool: Allow the cookies to cool completely on the baking sheet until the chocolate is set. Serve and enjoy! Store in an airtight container for up to a week.
Pro Tips for Perfect Peanut Butter Blossoms
- Don’t Overbake: Overbaking can lead to dry cookies.
- Warm Kisses: To prevent the Hershey’s Kisses from cracking, ensure they are at room temperature.
- Spacing Matters: Make sure you leave enough space between your cookies on the baking sheet.
- Cool Completely: Allow the cookies to cool completely on the baking sheet to allow the chocolate to set properly.
Delicious Variations on Peanut Butter Blossoms
Here are some fun ways to change up this classic recipe.
| Variation | Instructions/Adjustments |
|---|---|
| Peanut Butter Cup | Use mini peanut butter cups instead of Hershey’s Kisses. Press a cup into each cookie after baking. |
| Rolos | Substitute Rolos candies for Kisses. Place one Rolo on each cookie immediately after baking. |
| Different Kisses | Try different flavors of Hershey’s Kisses, like Hugs or special holiday flavors. |
| Almond Butter Blossoms | Substitute almond butter for peanut butter. These cookies might be a bit more fragile. |
| Cashew Butter Blossoms | Use cashew butter. You may need to add a tablespoon or two of flour if the dough is too soft. |
Troubleshooting: Common Problems and Solutions
- Cookies are too dry: Make sure to measure ingredients accurately.
- Chocolate melts: Make sure your Hershey’s Kisses are at room temperature.
- Cookies spread too thin: Make sure your oven is at the correct temperature.
- Cracked cookies: Don’t worry, the cracks are perfectly normal and add to the charm!
Serving Suggestions for Peanut Butter Blossoms
These cookies are perfect for any occasion! Serve them with a tall glass of cold milk, or pair them with coffee or tea. Arrange them on a cookie tray for parties, or include them in a gift basket for a loved one.
For a more festive touch, consider pairing them with a drink like the Cranberry Gin Spritz Mocktail.
How to Store Peanut Butter Blossoms
To keep your Peanut Butter Blossoms fresh:
- Room Temperature: Store in an airtight container for up to 1 week.
- Refrigerator: Place in an airtight container or zip-top bag and store for up to 2 weeks.
- Freezer: Place in an airtight container or freezer bag and freeze for up to 2 months. Thaw at room temperature before serving.
Frequently Asked Questions
Can I use natural peanut butter?
Yes, but the cookies might be a bit drier, so you may need to adjust the flour amount.
Can I freeze the cookie dough?
Yes, shape the dough into balls and freeze them on a baking sheet. Once frozen, transfer them to a freezer bag and bake straight from frozen, adding a few extra minutes to the baking time.
How do I prevent the chocolate kisses from melting?
Make sure the cookies are warm but not too hot, and use room temperature kisses.
Can I make these ahead of time?
Absolutely! Baked cookies can be stored in an airtight container for up to a week.
Can I double the recipe?
Yes, you can double the recipe. Make sure you use two baking sheets.
Conclusion
These Peanut Butter Blossoms are a classic for a reason! They’re easy to make, incredibly delicious, and always a crowd-pleaser.
If you’re looking for more holiday-themed recipes, check out these Amazing Christmas Cranberry Bars. I hope you enjoy baking this recipe as much as I do. If you try it, I’d love to hear about it! Leave a comment below, and let me know how they turned out. Happy baking!
For more recipes, follow us on Pinterest.