Hello there, fellow bakers! Jessy here, from The Savory Script. Today, I’m absolutely delighted to share a recipe that’s close to my heart and sure to bring a smile to anyone’s face: a truly charming Rose Cake Pops recipe.
These aren’t just any cake pops; they’re little edible works of art, bursting with flavor and designed to look like delicate roses. While they do require a bit of patience, with a total time of about 3 hours, the stunning results are entirely worth it. Get ready to impress your friends and family with these beautiful treats!
Table of Contents
An Elegant Rose Cake Pops Recipe
Ingredients
Equipment
Method
- Begin by creaming the softened butter and sugar in a bowl until the mixture is wonderfully light and fluffy. This aeration is key!
- Next, add your eggs one at a time, beating well after each addition to ensure they’re fully incorporated. Stir in the seeds from half a vanilla pod and a pinch of fine salt.
- In a separate, smaller bowl, sift together the Type 00 flour, wheat starch, and unsweetened cocoa powder. Sifting ensures no lumps and helps aerate the dry ingredients.
- Gradually add the sifted dry ingredients to the butter mixture, mixing until *just* combined. Overmixing can lead to tough cake bases. The batter should look smooth and rich. *[Photo/Video: Showing the batter consistency]*
- Pour this delicious chocolate batter into a disposable piping bag.
- Take your 8 round-bottom cones and carefully fill them with the batter using the piping bag. Focus the batter along the narrowest part, filling them about 7-8 full. This allows enough room for the batter to rise and bake evenly.
- Bake these in a preheated static oven at 350°F (175°C) for about 20 minutes. You’ll know they’re done when a toothpick inserted into the center comes out clean.
- Once baked, carefully remove them from the oven and let them cool completely in their cones before attempting to remove them.
- In a clean bowl, beat the sugar and softened butter together with electric whisks until you achieve a nice, creamy consistency.
- Add the seeds from the remaining half vanilla bean and one egg. Beat this mixture until it’s smooth and well combined.
- Now, add the sifted Type 00 flour, wheat starch, baking powder, and the zest of half a lemon. Mix everything gently with a hand whisk until you have a smooth, homogeneous batter.
- Pour this lighter batter into a separate disposable piping bag.
- Using your specific cakepop maker, carefully pour the rose batter into the molds using your piping bag. Cook according to the manufacturer’s pre-set program, which usually takes about 3 minutes.
- Once cooked, gently remove the cake pop balls and let them cool completely on a wire rack. They need to be fully cool and firm before proceeding.
- When they’re completely cooled, insert a lollipop stick firmly into the base of each cake pop ball. *[Photo/Video: Demonstrating inserting the sticks]*
- Gently melt the coarsely chopped white chocolate. You can do this in a double boiler over simmering water, stirring with a spatula until smooth, or in the microwave by heating in short, 15-30 second bursts, stirring between each, until melted. Be patient to avoid burning. *[Photo/Video: Showing proper melting technique]*
- In a small saucepan, heat your fresh liquid cream until it just begins to boil.
- Carefully add a few drops of red food coloring to the hot cream and stir until you reach your desired beautiful shade of red.
- Now, pour this vibrant red cream into the melted white chocolate. Stir continuously until the mixture is completely smooth and uniformly colored. This forms your colored coating.
- Dip each cooled cake pop ball into the colored white chocolate, rotating it gently to ensure it’s fully coated. Let any excess chocolate drip back into the bowl.
- Place the dipped cake pops upright into a polystyrene block to hold them steady while they set.
- Transfer the block to the freezer for at least 1 hour, or until the chocolate coating is completely firm and set. *[Photo/Video: Showing cake pops setting]*
- Once the initial coating is firm, take any leftover colored chocolate (gently reheat if it has solidified) and place it into a piping bag fitted with a small, fine tip.
- Now, the artistry begins! Pipe concentric circles onto each cake pop, starting from the bottom and working your way upwards. Try to make the circles smaller and tighter as you move towards the top, mimicking the natural shape of rose petals. This takes a little practice, but the effect is stunning! *[Photo/Video: Demonstrating the petal piping technique]*
- Allow these delicate petal decorations to set completely.
- Take your sugar paste and add a few drops of blue and yellow food coloring. Knead the paste thoroughly until the colors are fully combined and you achieve a lovely, vibrant green hue. *[Photo/Video: Showing coloring the sugar paste]*
- Roll out the green sugar paste on a clean surface to a thickness of a few millimeters, like a thin sheet.
- Using a leaf-shaped cookie cutter, or carefully with the tip of a knife, cut out small leaf shapes.
- Gently insert one or two of your beautifully crafted sugar paste leaves into the base of each set cake pop, just peeking out from beneath the “petals.”
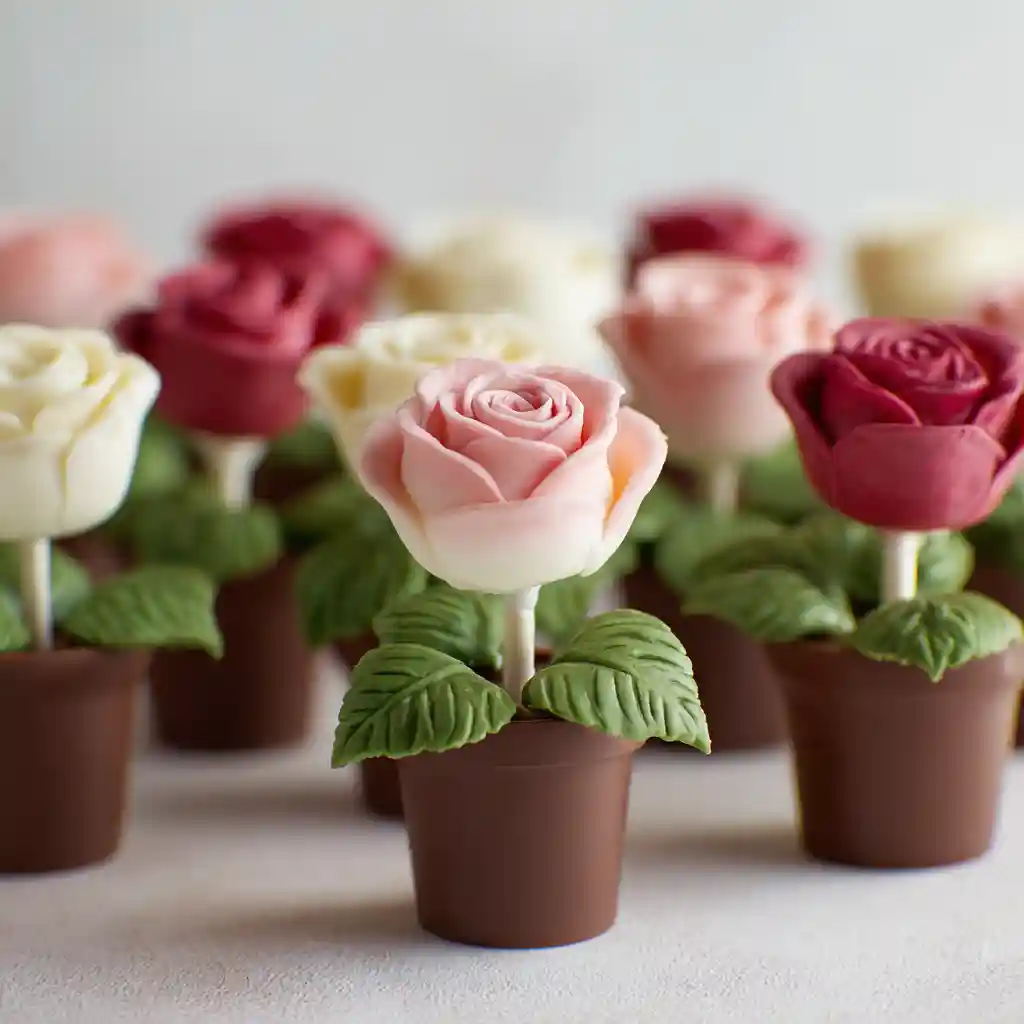
- Your exquisite Rose Cake Pops are now complete! They’re perfect for gifting or for adding a touch of floral elegance to any celebration. *[Photo/Video: Final assembled cake pops]*
Nutrition
Notes
Tried this recipe?
Let us know how it was!Why You’ll Love This Rose Cake Pops Recipe
I believe this particular Rose Cake Pops recipe stands out for a few wonderful reasons:
- Visually Stunning: The unique rose design, achieved through careful piping, makes these cake pops incredibly eye-catching and perfect for special occasions or as a delightful gift.
- Delightful Texture and Flavor: The combination of a tender cake base, smooth chocolate coating, and the subtle hint of lemon and vanilla creates a truly delicious treat that’s balanced and satisfying.
- Approachable Elegance: While they look sophisticated, the steps are broken down in a way that makes them achievable for home bakers, bringing a touch of elegance to your kitchen without overwhelming complexity.
Gathering Your Rose Cake Pops Ingredients
Let’s get our ingredients ready for these delightful Rose Cake Pops. Having everything measured out beforehand makes the baking process so much smoother.
| Ingredient | Quantity | Notes |
|---|---|---|
| Butter (room temp) | ½ cup | Essential for a tender cake crumb. Ensure it’s soft but not melted. |
| Sugar (for cake batter) | 0.6 cup | Provides sweetness and contributes to the cake’s structure. |
| Type 00 flour | ⅓ cup | This is a very fine Italian flour, similar to cake flour. All-purpose flour is a good substitute if you don’t have Type 00. |
| Wheat starch | 1.4 oz | Wheat starch helps create a lighter, more tender texture. Cornstarch or a bit more all-purpose flour can be used as alternatives. |
| Unsweetened cocoa powder | 3 ½ tbsp | For a rich, deep chocolate flavor in the base. |
| Eggs (medium) | 2 | These bind the ingredients and add richness to the cake batter. |
| Baking powder | 1 tsp | Our leavening agent, helping the cake bases rise. |
| Fine salt | to taste | A pinch of salt always enhances the other flavors. |
| White chocolate | 9 oz | This will be melted and colored for the beautiful rose petal coating. |
| Fresh liquid cream (boiling) | ½ cup | Used to create a smooth ganache with the white chocolate and to achieve the desired red color for the petals. |
| Sugar (for frosting/ganache) | 0.375 cup | For sweetening the frosting mixture. |
| Type 00 flour (for frosting) | ½ cup | This flour helps to thicken the frosting component. |
| Wheat starch (for frosting) | 2 oz | Contributes to a smooth and silky texture in the rose batter. |
| Butter (for frosting) | 4.3 tbsp | Adds richness and helps create a creamy frosting consistency. |
| Lemon peel | ½ | The zest of half a lemon adds a wonderful brightness that cuts through the sweetness. |
| Eggs (medium, for frosting) | 1 | Binds the rose batter and adds to its richness. |
| Baking powder (for frosting) | ¾ tsp | Ensures the rose-shaped cake pops have a perfect texture. |
| Vanilla bean | ½ | The seeds from half a vanilla bean provide a lovely aromatic depth. |
| Fine salt (for frosting) | 1 pinch | Just a tiny bit to balance the sweetness of the rose batter. |
| Food coloring (red) | to taste | To achieve that perfect rose petal hue. |
| Sugar paste | 5.25 oz | This is for crafting the little green leaves that complete the rose look. |
| Food coloring (yellow and blue) | to taste | Used to create the vibrant green color for the sugar paste leaves by mixing. |
Essential Tools for Perfect Rose Cake Pops
To make crafting these Rose Cake Pops a joy, having the right tools on hand makes all the difference. Here’s what I find indispensable:
- Mixer: A stand mixer or a good hand mixer is crucial for creaming butter and sugar to the perfect fluffy consistency.
- Piping Bags: You’ll need disposable piping bags for both the cake bases and the rose batter, allowing for precise filling and decorating.
- Round-Bottom Cones: These are used to bake the chocolate cake bases, giving them their unique shape.
- Cakepop Maker: This handy gadget makes baking the individual cake pop balls quick and consistent.
- Lollipop Sticks: Essential for turning your cake balls into cake pops.
- Double Boiler or Microwave-Safe Bowls: For melting white chocolate gently and smoothly.
- Spatula: For stirring and scraping down bowls.
- Cooling Rack: To allow your cake bases and cake pops to cool completely without getting soggy.
- Polystyrene Block: This is perfect for holding your dipped cake pops upright while they set.
- Cookie Cutters or Knife: Specifically, leaf-shaped cutters are helpful for making the sugar paste leaves, but a sharp knife works too.
Step-by-Step Guide to Crafting Your Rose Cake Pops
Now for the fun part! Let’s walk through creating these beautiful Rose Cake Pops together, step by step.
- Prepare the Cupcake Batter:
- Begin by creaming the softened butter and sugar in a bowl until the mixture is wonderfully light and fluffy. This aeration is key!
- Next, add your eggs one at a time, beating well after each addition to ensure they’re fully incorporated. Stir in the seeds from half a vanilla pod and a pinch of fine salt.
- In a separate, smaller bowl, sift together the Type 00 flour, wheat starch, and unsweetened cocoa powder. Sifting ensures no lumps and helps aerate the dry ingredients.
- Gradually add the sifted dry ingredients to the butter mixture, mixing until just combined. Overmixing can lead to tough cake bases. The batter should look smooth and rich.
- Pour this delicious chocolate batter into a disposable piping bag.
- Bake the Cupcake Bases:
- Take your 8 round-bottom cones and carefully fill them with the batter using the piping bag. Focus the batter along the narrowest part, filling them about 7-8 full. This allows enough room for the batter to rise and bake evenly.
- Bake these in a preheated static oven at 350°F (175°C) for about 20 minutes. You’ll know they’re done when a toothpick inserted into the center comes out clean.
- Once baked, carefully remove them from the oven and let them cool completely in their cones before attempting to remove them.
- Prepare the Rose Batter:
- In a clean bowl, beat the sugar and softened butter together with electric whisks until you achieve a nice, creamy consistency.
- Add the seeds from the remaining half vanilla bean and one egg. Beat this mixture until it’s smooth and well combined.
- Now, add the sifted Type 00 flour, wheat starch, baking powder, and the zest of half a lemon. Mix everything gently with a hand whisk until you have a smooth, homogeneous batter.
- Pour this lighter batter into a separate disposable piping bag.
- Bake the Cake Pop Balls:
- Using your specific cakepop maker, carefully pour the rose batter into the molds using your piping bag. Cook according to the manufacturer’s pre-set program, which usually takes about 3 minutes.
- Once cooked, gently remove the cake pop balls and let them cool completely on a wire rack. They need to be fully cool and firm before proceeding.
- When they’re completely cooled, insert a lollipop stick firmly into the base of each cake pop ball.
- Color the White Chocolate:
- Gently melt the coarsely chopped white chocolate. You can do this in a double boiler over simmering water, stirring with a spatula until smooth, or in the microwave by heating in short, 15-30 second bursts, stirring between each, until melted. Be patient to avoid burning. [Melt CANDIQUIK Coating according to directions on package. Slowly add a few drops of red food coloring directly into the melted CANDIQUIK]
- In a small saucepan, heat your fresh liquid cream until it just begins to boil.
- Carefully add a few drops of red food coloring to the hot cream and stir until you reach your desired beautiful shade of red.
- Now, pour this vibrant red cream into the melted white chocolate. Stir continuously until the mixture is completely smooth and uniformly colored. This forms your colored coating.
- Coat and Set the Cake Pops:
- Dip each cooled cake pop ball into the colored white chocolate, rotating it gently to ensure it’s fully coated. Let any excess chocolate drip back into the bowl.
- Place the dipped cake pops upright into a polystyrene block to hold them steady while they set.
- Transfer the block to the freezer for at least 1 hour, or until the chocolate coating is completely firm and set.
- Decorate with Petals:
- Once the initial coating is firm, take any leftover colored chocolate (gently reheat if it has solidified) and place it into a piping bag fitted with a small, fine tip.
- Now, the artistry begins! Pipe concentric circles onto each cake pop, starting from the bottom and working your way upwards. Try to make the circles smaller and tighter as you move towards the top, mimicking the natural shape of rose petals. This takes a little practice, but the effect is stunning! [Here’s what you’ll need to make these rose cake pops: · 8″ yellow cake (or use half of the cake if you want to make fewer cake pops – see my …]
- Allow these delicate petal decorations to set completely.
- Create the Green Leaves:
- Take your sugar paste and add a few drops of blue and yellow food coloring. Knead the paste thoroughly until the colors are fully combined and you achieve a lovely, vibrant green hue.
- Roll out the green sugar paste on a clean surface to a thickness of a few millimeters, like a thin sheet.
- Using a leaf-shaped cookie cutter, or carefully with the tip of a knife, cut out small leaf shapes.
- Assemble and Serve:
- Gently insert one or two of your beautifully crafted sugar paste leaves into the base of each set cake pop, just peeking out from beneath the “petals.”
- Your exquisite Rose Cake Pops are now complete! They’re perfect for gifting or for adding a touch of floral elegance to any celebration.
Variations and Flavor Ideas
Thinking about how to make these Rose Cake Pops even more personal? Here are a few ideas to play with:
| Variation | Cake Flavor | Frosting/Coating Color | Notes |
|---|---|---|---|
| Classic Rose | Vanilla/Red Velvet | Red/Pink | The timeless, elegant rose look everyone adores. |
| Lemon Zest Rose | Lemon Pound Cake | Yellow/Pale Pink | A brighter, zesty twist that’s incredibly refreshing. |
| Strawberry Kiss | Strawberry Cake | Light Pink/White | A sweet, fruity option that’s delicate and utterly charming. |
| White Chocolate Rose | White Cake | White/Ivory | An elegant and subtly flavored choice, letting the white chocolate shine. |
Tips for Perfect Rose Cake Pops
Achieving that picture-perfect finish is all about a few key details. Here are my go-to tips for success:
- Cake Moisture: The cake bases should be moist but not overly wet. If they seem too dry, they won’t bind well. If they’re too moist, they can become mushy. Bake just until done, and don’t over-crumble.
- Melting Chocolate: Patience is key when melting chocolate. Always use low heat, whether on the stovetop or in the microwave, and stir frequently. If chocolate seizes (gets thick and grainy), it’s often due to overheating or a tiny bit of water.
- Realistic Petals: For the rose petals, practice your piping on parchment paper first. Use consistent, gentle pressure. Don’t be afraid to vary the size slightly; real roses aren’t perfectly uniform! A small, round piping tip works best for this delicate design.
Troubleshooting Common Cake Pop Problems
Even the most experienced bakers encounter little hiccups. Here’s how to tackle common cake pop challenges:
| Problem | Solution |
|---|---|
| Cake pops are too dry/crumbly | Ensure your cake batter isn’t over-baked. When mixing cake crumbs with frosting, add just enough frosting to bind them into a cohesive dough. If it still seems too dry, add a tiny bit more frosting or a tablespoon of milk or cream. |
| Cake pops are too wet/fall apart | Your cake mixture is too moist. Allow the cake crumbs to dry out slightly before mixing with frosting. Use less frosting next time. Make sure the cake balls are completely cooled and firm before handling. |
| Chocolate coating is cracking | This often happens due to temperature shock. Ensure the chocolate is at the right temperature for dipping (not too hot, not too cold) and that your cake pops are at room temperature, not straight from the fridge. Avoid sudden temperature changes. |
| Cake pops fall off the stick | Make sure the lollipop stick is inserted firmly into a well-formed cake ball. For extra security, dip the end of the stick in melted chocolate before inserting it. Allow the dipped cake pops to set fully before handling them extensively. |
| Frosting/Coating won’t adhere or slides off | Ensure the cake pops are completely cooled and dry before dipping. If the chocolate coating is too thick, it can slide off in large blobs. If it’s too thin, the cake pops might absorb moisture, causing issues. Adjust consistency by adding a little more chocolate or oil. |
| Rose petals look messy | Practice makes perfect! Ensure your piping bag tip is small and you are using controlled, smooth movements. Start with simpler petal designs if you’re new to this. Sometimes, gently shaping petals with a toothpick immediately after piping can help. |
How to Store Rose Cake Pops
Proper storage is key to keeping your beautiful Rose Cake Pops looking and tasting their best. I generally recommend storing them at room temperature if they don’t have a cream-based filling. Place them in an airtight container to protect them from humidity and dust.
If you’ve used ingredients that require refrigeration, or if your kitchen is very warm, storing them in the refrigerator in an airtight container is best. Just be aware that refrigeration can sometimes affect the texture of the coating, making it harder.
Presentation and Gifting Ideas
These Rose Cake Pops are practically gifts in themselves! For a stunning presentation, arrange them in a decorative box with individual compartments or cell dividers to keep them safe and looking pristine.
You can also wrap each pop individually in clear cellophane bags and tie them with a pretty ribbon for a charming party favor. They look absolutely gorgeous displayed on a tiered stand as part of a dessert table, or clustered together in a small vase or jar for a unique centerpiece.
FAQs Rose Cake Pops Recipe
Let’s address some common questions I get about making cake pops.
What type of cake works best for cake pops?
Denser cakes like pound cake or chocolate cake tend to hold their shape better. The recipe provided here creates a cake base that’s perfectly suited for cake pops.
How do I achieve the perfect cake-to-frosting ratio?
The trick is to use just enough frosting to moisten the cake crumbs so they can be rolled into balls. You’re aiming for a dough-like consistency that holds its shape without being overly sticky or dry.
How do I melt chocolate properly to avoid burning?
Always use gentle heat. A double boiler is ideal, or microwave in short intervals (15-30 seconds), stirring thoroughly between each burst until smooth. High heat is the enemy of melted chocolate!
What are some variations in flavor for rose cake pops?
As I mentioned in the “Variations and Flavor Ideas” section, you can get creative! Consider lemon, strawberry, or even different colored coatings and fillings for a unique twist.
What are the best tools for making rose cake pops?
You’ll definitely want a good mixer, piping bags, lollipop sticks, a cakepop maker for consistency, and tools for melting and coating chocolate. For the rose effect, a small round piping tip is very helpful.
How do I package rose cake pops for gifting?
Individually wrapping them in cellophane and tying with ribbon is a classic. Alternatively, arrange them carefully in a decorative box with dividers to prevent any damage during transport.
Conclusion
And there you have it, my friends! A complete guide to creating these absolutely enchanting Rose Cake Pops recipe. I truly hope you find joy in making them, just as I do. They’re a testament to how beautiful and delicious homemade treats can be, proving that a little bit of care and creativity can result in something truly special.
Now, it’s your turn! I’d absolutely love to hear about your experience making these. Did you try any fun variations? Did you gift them to someone special? Please leave a comment below to share your thoughts, ask any questions you might have, or even upload a photo of your gorgeous Rose Cake Pops! Happy baking!